![Switching to RAMPS 1.4 – Firmware [ANET]](https://3d-maker.info/wp-content/uploads/2017/07/cropped-IMG_20170704_205639.jpg)
![Switching to RAMPS 1.4 – Firmware [ANET]](https://3d-maker.info/wp-content/uploads/2017/07/preview-firmware-762x200.png)
Download preconfigured configuration.h for the 12864 or 2004 LCD without autoleveling for Marlin 1.1.x:
Updated for Marlin 1.1.9!
Download “Configuration.h”
Anet-A8-1.zip – Downloaded 27670 times – 48 KBContents
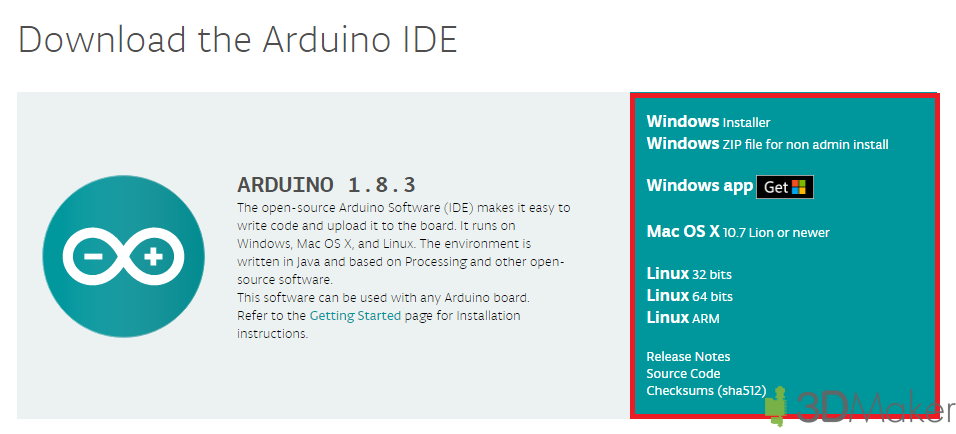
Installing Arduino IDE, Download Marlin
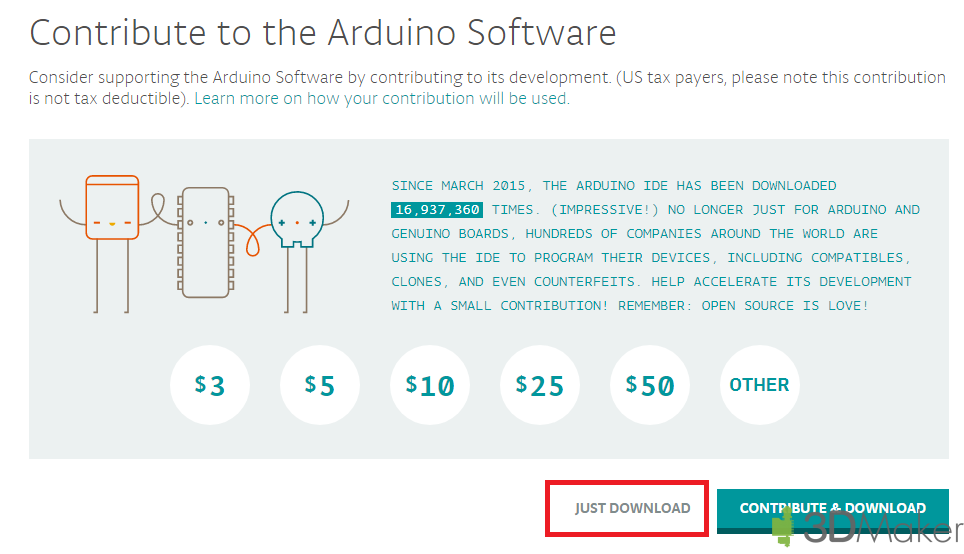
Go to the Arduino Homepage and chose your operating system, download Arduino IDE and install it.
Download the newest Marlin firmware by clicking on the “Clone or download”-Button and then on “Download ZIP”.

Unzip the zip archive anywhere you want for example to the Desktop.
Navigate to the extracted archive and go into the folder “example_configurations”, “Anet A8”. Copy this file and paste it in the main folder.
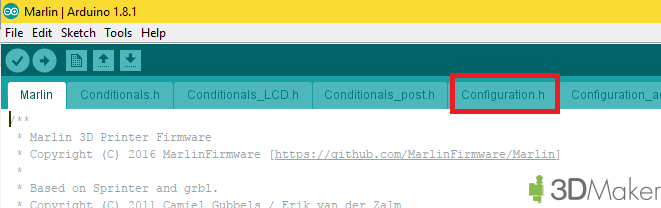
Now open the Marlin.ino and open the configuration.h.
Mandatory changes
Changing the board
We will have to change the board to the RAMPS by changing the line
#define MOTHERBOARD BOARD_ANET_10 |
to
#define BOARD_RAMPS_14_EFB |
The EFB stands for Extruder, Fan, Bed. If you are going to use two extruders you will have to change the line to
#define BOARD_RAMPS_14_EEB |
Setting up the display
You can still use the original Anet Display if you want to, however you will have to create an adapter, because the RAMPS uses a different Pin layout then the Anet. I think it is not worth the time setting all up. Just get a new display for a couple of bucks that is compatible to the Ramps, like this 2004 or 12864.
First of all we have to disable the Anet display by writing two // in front of the following line:
#define ANET_KEYPAD_LCD |
Then we will have to configure marlin to use the display we have. For the full graphics 12864 display use the following one:
#define REPRAP_DISCOUNT_FULL_GRAPHIC_SMART_CONTROLLER |
You will also need to install the u8glib library. Download the zip file from https://bintray.com/olikraus/u8glib/Arduino
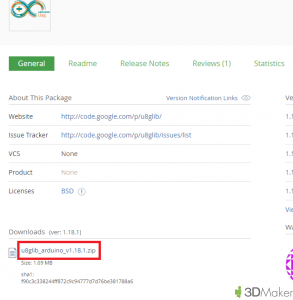
and install the library

Also add the following line at the begining of the configuration.h
#include |
For the 2004 display use this one:
#define REPRAP_DISCOUNT_SMART_CONTROLLER |
Optional changes
Baudrate
The Anet A8 used a baudrate of 115200. This is already set up in the example configuration under:
#define BAUDRATE 115200 |
Giving the printer a name
To give your 3D-printer a name, you will have to change the line:
#define CUSTOM_MACHINE_NAME "3D Printer" |
Remove the two // in front of it and type in the name instead of “3D Printer”.
Setting up the extruders
Under the following line you can set up how many extruders you are going to use. If you have the standard A8 leave the number on 1.
#define EXTRUDERS 1 |
Setting up the thermistors
If you are using the normal thermistors you can leave the settings as is. However if you changed the thermistors for example to the NTC3950 use the thermistor 1. For the hotend change the following line:
#define TEMP_SENSOR_0 5 |
and for the heatbed change this line:
#define TEMP_SENSOR_BED 5 |
A safety feature for the thermistors are the mintemp. Below these temperatures the printer will not heat up the heatbed/hotend. This is for example necessary if the thermistors are not connected or broken. So that the printer will not heat up till it begins to burn.
#define HEATER_0_MINTEMP 5 #define HEATER_1_MINTEMP 5 #define HEATER_2_MINTEMP 5 #define HEATER_3_MINTEMP 5 #define HEATER_4_MINTEMP 5 #define BED_MINTEMP 5 |
Another safety feature ist the maxtemp. This ensures, that the hotend/heatbed does not heat up above a certain temperature. For the hotend the temperature is limited due to the PTFE inliner, which decomposes above these temperatures and produces toxic fumes. For the heatbed it is a safety feature against burning.
#define HEATER_0_MAXTEMP 275 #define HEATER_1_MAXTEMP 275 #define HEATER_2_MAXTEMP 275 #define HEATER_3_MAXTEMP 275 #define HEATER_4_MAXTEMP 275 #define BED_MAXTEMP 130 |
PID-control
For the hotend the PID control is automatically turned on. If you want to use this feature also for the heatbed, you will have to activate the following line:
#define PIDTEMPBED |
You will have to change the Kp, Ki, Kd values both for your hotend and heatbed. A Tutorial how to get these value will follow shortly.
For the hotend change the values under:
#define DEFAULT_Kp #define DEFAULT_Ki #define DEFAULT_Kd |
and for the heatbed under:
#define DEFAULT_bedKp #define DEFAULT_bedKi #define DEFAULT_bedKd |
Thermal Runaway
#define THERMAL_PROTECTION_HOTENDS // Enable thermal protection for all extruders #define THERMAL_PROTECTION_BED // Enable thermal protection for the heated bed |
The thermal runaway protection can detect if there is a problem when heating up, for example when the thermistor falls out or the wires are not connected well enough anymore. This can prevent fires, so do NOT deactivate this feature. The feature is activated by default.
Steps/mm
If you are using the A4988, DRV8825 with 1/16 microstepping or the TMC2100 with 1/16 microstepping and 1/256 interpolation, the steps/mm are already set up properly. If you use 1/32 microstepping you will have to double the values, where you are using 1/32 microstepping. You can do this at:
#define DEFAULT_AXIS_STEPS_PER_UNIT { 100, 100, 400, 100 } |
The order of the values are for the x, y, z-Axis, Extruder.
The max feedrate can be set under:
#define DEFAULT_MAX_FEEDRATE { 400, 400, 8, 50 } |
Acceleration and Jerk
#define DEFAULT_MAX_ACCELERATION { 2000, 2000, 100, 10000 } #define DEFAULT_ACCELERATION 400 // X, Y, Z and E acceleration for printing moves #define DEFAULT_RETRACT_ACCELERATION 1000 // E acceleration for retracts #define DEFAULT_TRAVEL_ACCELERATION 1000 // X, Y, Z acceleration for travel (non printing) moves |
and
#define DEFAULT_XJERK 20.0 #define DEFAULT_YJERK 20.0 #define DEFAULT_ZJERK 0.3 #define DEFAULT_EJERK 5.0 |
The acceleration and Jerk settings have great impact on the ringing and ghosting of your 3D-prints. If you have any problems with these, lower the values. Jerk is the minimal difference in speed where the firmware will be doing an acceleration. Below this value there will not be an acceleration, but an instant change of direction.
Autoleveling
If you want to use auto-leveling you will have to activate the following for an inductive or capacitive sensor:
#define FIX_MOUNTED_PROBE |
and for the BL-Touch:
#define BLTOUCH |
For the inductive or capacitive sensor it is also recommended to turn off the heating, because this could interfere with the sensing.
#define PROBING_HEATERS_OFF // Turn heaters off when probing |
You will also have to set the offset of the probe from your nozzle. You will mostly find these values from the mounts from thingiverse or any other place. Set these values at:
#define X_PROBE_OFFSET_FROM_EXTRUDER 0 // X offset: -left +right [of the nozzle] #define Y_PROBE_OFFSET_FROM_EXTRUDER 0 // Y offset: -front +behind [the nozzle] #define Z_PROBE_OFFSET_FROM_EXTRUDER 0 // Z offset: -below +above [the nozzle] |
You can also change the speed between the probing points at:
#define XY_PROBE_SPEED 6000 |
If your probe sits too low after going to the other probing point and gets triggered immediately, change the following distances
#define Z_CLEARANCE_DEPLOY_PROBE 10 // Z Clearance for Deploy/Stow #define Z_CLEARANCE_BETWEEN_PROBES 5 // Z Clearance between probe points |
To avoid any extreme missreadings from your autoleveling sensor, there is also a safety feature in marlin under
#define Z_PROBE_OFFSET_RANGE_MIN -20 #define Z_PROBE_OFFSET_RANGE_MAX 20 |
To adjust the z-offset you will probably need to go lower than z=0, so disable the Software endstops by putting two // in front of them.
#define MIN_SOFTWARE_ENDSTOPS |
Now chose your bed levling procedure. I would recommend one of the following ones. Just try them out which works best for you. Do NOT use more then one!:
#define AUTO_BED_LEVELING_BILINEAR #define AUTO_BED_LEVELING_UBL #define MESH_BED_LEVELING |
Each Autoleveling procedure has its different settings. For the AUTO_BED_LEVELING_UBL under Unified Bed Leveling, MESH_BED_LEVELING under Mesh
Changing the direction of an axis
If your axis is moving in the wrong direction, you can either turn around the stepper connector on the RAMPS, or just change the value from true to false or the other way around.
#define INVERT_X_DIR false #define INVERT_Y_DIR false #define INVERT_Z_DIR true |
Travel limits after homing
If you changed your hotend and the hotend mount, your prints probably won’t be in the middle anymore. To fix this upload the min offsets with 0 and navigate to the edge of your heatbed. Remember the position on the x,y-axis and change the X_MIN_POS and Y_MIN_POS. Input the values with a -.
#define X_MIN_POS -33 #define Y_MIN_POS -10 #define Z_MIN_POS 0 #define X_MAX_POS 220 #define Y_MAX_POS 220 #define Z_MAX_POS 240 |
Additional Features
There you can activate features like the EEPROM (recommended)
#define EEPROM_SETTINGS // Enable for M500 and M501 commands |
Preheat settings
#define PREHEAT_1_TEMP_HOTEND 190 #define PREHEAT_1_TEMP_BED 60 #define PREHEAT_1_FAN_SPEED 0 // Value from 0 to 255 #define PREHEAT_2_TEMP_HOTEND 240 #define PREHEAT_2_TEMP_BED 90 #define PREHEAT_2_FAN_SPEED 0 // Value from 0 to 255 |
and nozzle cleaning.
#define NOZZLE_CLEAN_FEATURE |
Changing the language, SD card and misc
To change the language you will have to change the following line:
#define LCD_LANGUAGE en |
All available languages are above.
To activate the SD-Card use the following line:
#define SDSUPPORT |
If the Encoder moves in the wrong direction you can use the following two options to change that:
#define REVERSE_ENCODER_DIRECTION #define REVERSE_MENU_DIRECTION |
To activate the buzzer:
#define SPEAKER |
Uploading the firmware
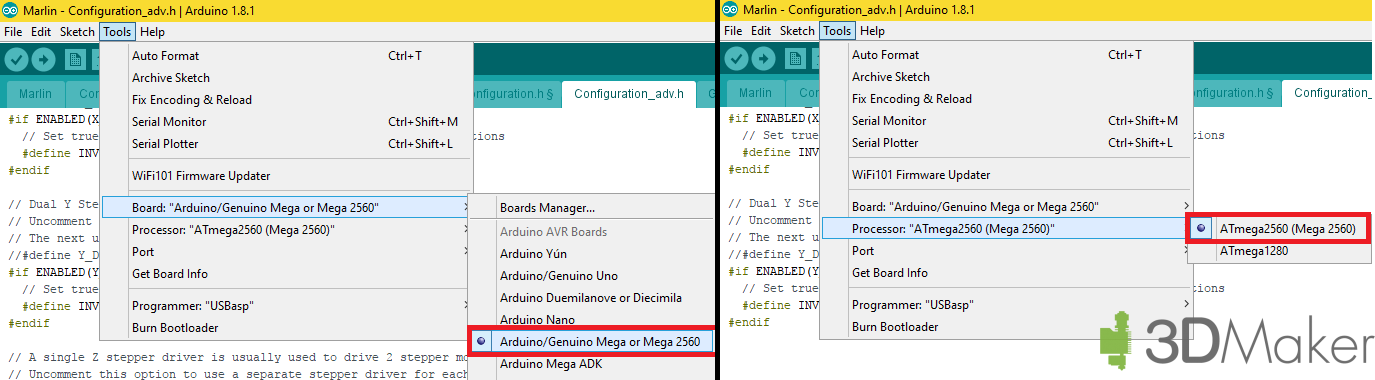
First chose the right Board by clicking on Tools — Board — Arduino/Genuino Mega or Mega 2560. Then the right processor ATmega2560 (Mega 2560). The last thing you have to configure is the Port. After pluging in the USB cable of the Ramps to the computer a new COM port will appear. To upload the firmware click on the arrow pointing to the right. Thats it. You have succesfully uploaded your firmware to the Arduino.
Hello
First of all I want to thank you for your great effort and I would like to tell you I could get my printer to work without this guide so thank you very much.
After I upload the firmware I run the print and I have a problem with the z homing it is homing the tip of left edge of the bed and also it prints outside the bed . I’m using the stock extruder mount . I would be more thankful if you could help me solving this problem
Hello,
for the tip of the bed check if the safe homing is activated. Try out the search with control+f.
For the printing outside the bed, check the offsets after homing, as well as your settings in your slicer (Do NOT check the middle of the bed is 0!)
I HAVE ENABLING Z SAFE HOMING AND IT HOME ON THE BED NOW THANK YOU . BUT I GOT ANOTHER PROBLEM IT IS NT PRINTING IN THE CENTER IN ORDER TO SET IT TO PRINT IN THE CENTER I HAVE TO SET THESE VALUE
#define X_MAX_POS 220
#define X_MIN_POS -170
#define Y_MAX_POS 220
#define Y_MIN_POS -110
#define Z_MAX_POS 240
#define Z_MIN_POS 0
Are you using Cura?
The disable the option the centre of the bed is 0
Hi,
First of all, thank you for the great tutorial. Im making a change to ramsp board. I am planing to use NTC3950
#define TEMP_SENSOR_0 1
Is this the right code?
I am also using Drv8825 for steppers, what parametere should I use? I read somewhere that it has 1/16 and 1/32 stepping. That got me confused.
Hi,
yes that is the right code for the type of sensor.
Imho the DRV are not a good idea for the small stepper motors of the anet/tronxy. These are ment for bigger motors with a higher inductance. Sometimes you will hear a very high pitch noise and there are some problems with very slow speeds. However try it out. Also the 8bit controler is quite limited with 1/32 microstepping. I would recommend using the A4988 or the TMC2100.
Install all Jumpers like for the A4988 and double all of the values , so from:
#define DEFAULT_AXIS_STEPS_PER_UNIT { 100, 100, 400, 100 }
to
#define DEFAULT_AXIS_STEPS_PER_UNIT { 200, 200, 800, 200 }
That should be it.
Thanks very much. Great guide. Any chance of doing a tutorial for Anet A8 with BL Touch Auto-levelling.
Sure i can. For the original Anet board or the RAMPS?
Hi,
RAMPS would be great. Much appreciated.
Hello, thanks for your tuto
I have an error when compilating, it shows this line as red:
#define MB(board) (MOTHERBOARD==BOARD_##board)
How can I solve it?
Double check what you have written in the configuration.h under #define MOTHERBOARD
It should be
#define MOTHERBOARD BOARD_RAMPS_14_EFB
or
#define MOTHERBOARD 43
if you can you should change that in the instructions in the changing the boards section
It was already in the Tutorial since the beginning. Maybe read the whole tutorial 😉
http://3d-maker.info/switching-to-ramps-1-4-firmware-anet/#Changing_the_board
Primero que nada mil gracias por tu tiempo. me sale este mensaje al compilar
Arduino:1.8.5 (Windows 10), Tarjeta:”Arduino Yún”
In file included from sketch\MarlinConfig.h:26:0,
from I:\3D SOFTWARE\ACTUALIZACION\Actualizacion para arduino\Marlin-1.1.x\Marlin\Marlin.ino:31:
fastio.h:56: error: #error “Pins for this chip not defined in Arduino.h! If you have a working pins definition, please contribute!”
#error “Pins for this chip not defined in Arduino.h! If you have a working pins definition, please contribute!”
^
fastio.h:314: error: #error “unknown CPU”
#error “unknown CPU”
^
In file included from sketch\pins.h:61:0,
from sketch\MarlinConfig.h:34,
from I:\3D SOFTWARE\ACTUALIZACION\Actualizacion para arduino\Marlin-1.1.x\Marlin\Marlin.ino:31:
pins_RAMPS.h:48: error: #error “Oops! Make sure you have ‘Arduino Mega’ selected from the ‘Tools -> Boards’ menu.”
#error “Oops! Make sure you have ‘Arduino Mega’ selected from the ‘Tools -> Boards’ menu.”
^
In file included from sketch\MarlinConfig.h:40:0,
from I:\3D SOFTWARE\ACTUALIZACION\Actualizacion para arduino\Marlin-1.1.x\Marlin\Marlin.ino:31:
SanityCheck.h:569: error: #error “To use BED_LIMIT_SWITCHING you must disable PIDTEMPBED.”
#error “To use BED_LIMIT_SWITCHING you must disable PIDTEMPBED.”
^
SanityCheck.h:738: error: #error “Auto Bed Leveling requires one of these: PROBE_MANUALLY, FIX_MOUNTED_PROBE, BLTOUCH, SOLENOID_PROBE, Z_PROBE_ALLEN_KEY, Z_PROBE_SLED, or a Z Servo.”
#error “Auto Bed Leveling requires one of these: PROBE_MANUALLY, FIX_MOUNTED_PROBE, BLTOUCH, SOLENOID_PROBE, Z_PROBE_ALLEN_KEY, Z_PROBE_SLED, or a Z Servo.”
^
exit status 1
#error “Pins for this chip not defined in Arduino.h! If you have a working pins definition, please contribute!”
Este reporte podría tener más información con
“Mostrar salida detallada durante la compilación”
opción habilitada en Archivo -> Preferencias.
The solution is in the error message.
Fail no.1
Make sure you have ‘Arduino Mega’ selected from the ‘Tools -> Boards’ menu.”
Fail no.2
error “To use BED_LIMIT_SWITCHING you must disable PIDTEMPBED.”
Just type // in front of the BED_LIMIT_SWITCHING
Fail no.3
“Auto Bed Leveling requires one of these: PROBE_MANUALLY, FIX_MOUNTED_PROBE, BLTOUCH, SOLENOID_PROBE, Z_PROBE_ALLEN_KEY, Z_PROBE_SLED, or a Z Servo.”
Select one by removing the two // for what you have.
SanityCheck.h:314: error: #error “MAX_SOFTWARE_ENDSTOPS requires at least one of the MAX_SOFTWARE_ENDSTOP_[XYZ] options.”
#error “MAX_SOFTWARE_ENDSTOPS requires at least one of the MAX_SOFTWARE_ENDSTOP_[XYZ] options.”
^
exit status 1
#error “You are using an old Configuration.h file, update it before building Marlin.”
The above is shown when uploading firmware. What should I do?
Updated the configuration.h to fit the new Marlin firmware
I just try to compile the Marlin sketch with the pasted 12864 configuration.h file.
Arduino IDE 1.8.7 gives an error after compiling:
#error “you are using an old Configuration.h file, update it before building Marlin.
What does that mean?
Do i have to change the original Marlin 1,1 configuration.h myself?
I just updated the configuration.h files. Try them out
Thank you for providing the configurations.h files! I followed your video but I got something wrong as my Anet would only move a little in the wrong direction when homing. I downloaded your file, made a few minor changes to how the menu and not work, uploaded it, and my Anet can now home and more properly!
P.S. My husband and I watch a lot of your videos. Thanks!!
thank you. you really help me a lot! have not tested yet but will get to that. THANK YOU
Best tutorial on the web so far, 2 days of frustration solved in a couple of hours after viewing video a couple of times.
One or two minor hiccups but easily solved.
Many thanks for all of your hard work.
I have uploaded this code to my board
and everything is working except the extruder motor
I plugged it it to a schematic i found, but it must not match this code
if anyone can tell me how to make my motor work that would be great!!!
Is the extruder heated up to 190-200°C? If not Marlin prevents extrusion to not damage the extruder. Otherwise try to plug in the extruder in the x-Axis connector and move the x-axis
The original Anet A6 board has failed. I have RAMPS1.4 with Arduino Mega, I can use the instructions in your movie to make it functional on my A6 printer.
Thank you!
Is your configuration.h file still available somewhere, the download button doesnt seem to be working. Ive followed your video but am having issues with getting the printer to home and stop at the endstops
Yes, it is still available. For me the download button is working. Maybe your adblock/popup blocker is doing something.
Try out this link: http://3d-maker.info/download/149/
Keep in mind this is not yet updated for the marlin firmware 2.x. Just use the previous version from: https://github.com/MarlinFirmware/Marlin/archive/1.1.x.zip
Thank you, i just downloaded the file now. But it didnt seem to fix the issue im having. Maybe you might know where i can look to troubleshoot it. Every time i home the axis will move towards the endstops(im using the 2 pin ones that came with the a8) but wont stop at them the motor keeps going until i pull the power. I tried homing via the menu and also tried each axis in printrun but ive drawn a blank. I also bought a new ramps board thinking that that was the issue but it doesnt seem to be. Would you have any idea what i can try netx?
Are you sure the endstop is connected properly? Can you send me photo of the connection on the ramps?
Awesome Man, I was able to assign all these values in my new ramps 1.4, I had to do it as my Anet A8 board fried the extruder output, I think this is going to make it a better printer, i was really concerned about some of these values, i feel at ease now as I compiled and installed with no trouble. i decided to go on a 1.9.1
I am thinking about using a 1.6 Board soon, do you think I can use the same values for that board and using marlin 2.0? Thanks man, cheers!
The Ramps 1.6 is more or less the same board, so you can use the same values. For Marlin 2.0 alot has changed. Using the same config file won’t work. However copying the values into the Marlin 2.0 config should work.
I still have a problem, my Z motors are not moving correctly in Marlin 2.0 I could make them work with Marlin 1.9.x it was homing perfectly, when I changed the extruder number and the thermistor everything stopped working, I had to switch all of the endstops, I am thinking about switching to repetier and use it without endstops as it is becoming impossible to make them work
Hello there, thanks for your tutorial. I’ve been following this from beginning (using ramps 1.4, a4988 driver, 12864LCD, and the rest are the same anet a8 the original part) and finished uploading firmware, I’m using latest marlin now.
After uploading marlin, my printer does not start printing in the center, but it starts printing in the rear right corner of the bed. How to solve this?
Thank you
Hello,
have you chaked, that you used the same dimensions like in the tutorial? I am not 100% sure what changed with the newest marlin, however the current version is not compatible.
Greetings
3DMaker